supplies

All posts tagged supplies

Etsy Finds: Skull Charms and Beads

Published March 10, 2015 by kurolace

Hi hi Sweet Strangelings!

Recently I’ve been trying to make new jewelry designs that are a bit darker in nature. You see, when I first started making jewelry I was just sort of indiscriminately buying supplies to try different styles and what not (BTW this is a terrible plan – I’m now stuck with a large sum of “cash” tied up in supplies that don’t match my intended brand style). So, what better place to start than skulls! 🙂 Yay!

So I’m a bit picky when it comes to skulls for my jewelry. I don’t like big obnoxious, ugly skulls, and I have an unexplainable aversion to anything Day of the Dead. I think it comes from being born and raised in NM… DOD stuff is just too common place around here.

So, here are some cool Etsy finds for skulls! I hope you’ll enjoy looking 🙂


Etsy seller: PrettyRoughDesign

Etsy seller: PrettyRoughDesign

So there are tons of carved skulls available in the loose bead market. But these are the best looking ones I’ve found. I’m not too keen on the bright bone/howlite/resin ones, which look sorta clumsy to me. But these ones from PrettyRoughDesign are made from buffalo bone, and have cranial cracklature, which is a delightful detail in my opinion. They ship from Indonesia and cost $13.50 ea + sh. So yeah, they are one the more expensive side of the spectrum. Then again, you get to choose the color (the picture shows the range from cream to dark grey).


beautyyourlifebirdskull

BeautyYourLife

Next up are these gold colored bird skulls. I love the look of bird skulls, which are more elegant than human ones, but I’m not keen on using real ones. Originally I was out to find natural bone colored ones (made from resin), but these gold ones are charming as well. They are 40mm long, so just a bit under 2 inches. They ship from Chinese seller BeautyYourLife and are made form zinc alloy, supposedly lead and nickle free. I would prefer gold plated brass, but oh well. 50 pieces for $12 + sh, this reflects the fact they are not gold plated.


goldmatteskulldesignyourheart

DesignInYourHeart

I found a Korean supplier who has quite a few cute charms available. Among them were two skull
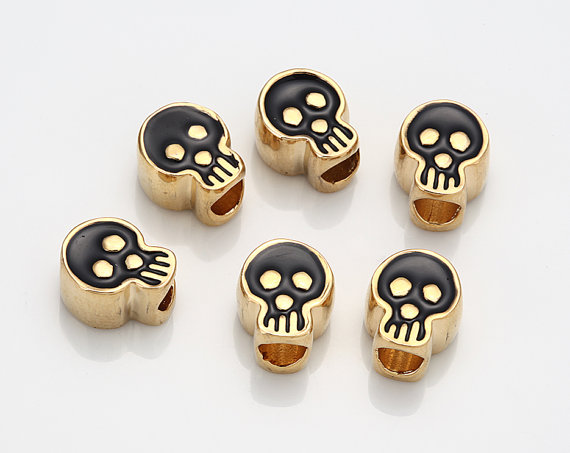
DesignInYourHeart

DesignInYourHeart

designs that I really liked. Both are actually beads, as opposed to charms. By now you may realize that I currently favor gold colored/plated items. These beads are gold plated, but it doesn’t mention what the base metal is. The price for the gold ones, which have a horizontal hole, is $3.40 for 2 pieces, and the black epoxy ones, which have a wide vertical hole, are $5.00 for 2 pieces. Like I said, this seller also has lots of other cute designs, if skulls aren’t your thing.


beadingshazsmallskull

beadingshaz

Finally, some silver ones! This have cutesy look to them, in my opinion. They seem a bit cartoon-y (deformed), without being too cartoon-y. I tried to find them being offered by a US seller, or Chinese supplier, but no such luck. So, you can find them from UK based seller beadingshaz. They are “silver color” alloy, lead and nickle free. They are fairly small: 13mm in length, which is perfect for earrings or bracelet charms. 10 cost $1.86 USD, but shipping is another $6, making them about $0.80 each (which is why I was hoping to find a Chinese supplier – usually buying it directly from China is much cheaper in regards to shipping).


swarovskicrystalskull

FireMountainGems

Lastly, I’d like to feature the Swarovski crystal skulls, which are a relatively new addition to Swarovski’s product line (I think they came out about 1 year ago). You can find these on Etsy, or on a jewelry supply site like FireMountainGems. They are 14mm long, and have a vertical hole up through the skull. Yes, they are sorta borderline “clunky,” but the sparkle helps make up for that. Plus they make me think of Mayan crystal skulls and whatnot! They come in a variety of colors, and are about $5.60 each, depending on where you purchase them.

Okay, that’s it! Obviously there are lots of other skull charms and beads that you can find on Etsy and other sites… Like jewel-incrusted ones, day of the dead ones, kinda tribal looking ones, etc. But I prefer these more elegant ones, and hopefully in the near future I’ll be using them in some jewelry designs!

Until we meet again! 🙂

Advertisement

How To: Straighten Ribbons

Published February 14, 2012 by kurolace

I use a lot of ribbons to make hair accessories and jewelry… and sometimes I buy those “grab bag” deals at my local craft store. Inevitably, some of the ribbons are crumpled up… to the point of being unusable. But ribbons are expensive… so I don’t want to throw those crinkled ribbons away. Fortunately, there is a very easy, and fast, way to straighten ribbons.

Hair straightener & wrinkled up ribbon

All you need is the crinkled ribbon and a hair straightener. I think a large curling iron would also work, because large, loose curls in a ribbon aren’t obvious in most projects.

The process is simple and probably obvious to most people, but here’s a quick step-by-step:

Plug in the straightener and turn dial to lowest setting. Remember most ribbons are made from synthetic materials, which can melt if you use too high of a setting.

Slowly and firmly start to straight iron the ribbon. Start ironing just above the wrinkled part, moving slowly along the length of the ribbon to the end. Repeat this over and over until you notice the ribbon looking much better.

Depending on the type of ribbon you are working with, some creases might still be visible. The red ribbon pictured has a more paper-y feel to it, and still has creases… but it’s now much more workable than when it was all wrinkled up.  Straightening works very well on satin ribbons, although I sadly don’t have any pictures to show you that.

Yes, still creased, but much better than before!

So, there you have it… No reason to buy a fancy “ribbon straightener”… (yes, they do make these).

How To: Put Together a Crafting Kit

Published February 4, 2012 by kurolace

When it comes to craft supplies, there are a few basic, general items which you’ll use over and over – even as your crafting interests evolve and change. In today’s entry, I’ll list a few things that you might consider gathering together if you’re new to the world of crafts, or if you want to make a present for someone just getting started in crafts.

Image

Just some of the items you might like to include...


Here’s a list of some of the things you might want to include in your kit:

  • Scissors: One of the quintessential of crafting. You should (and probably already do) have more than one pair. Smaller, school-supply type scissors are usually good enough for paper cutting, getting into packages, trimming stay ends, etc… but having a nice pair of big utility scissors is handy too.
  • Measuring Tools: “Measure twice, cut once” holds true for crafts other than just sewing. Make sure you have at least 1 ruler on hand, but it can be nice to have a few extra so that you have multiple options. If you really can only afford one ruler, make it a metal / aluminum one – or one with a metal edge. That way you can use it as a straight edge when cutting with an Xacto blade. Also consider including a measuring tape, which is useful when you need to measure something that isn’t flat.
  • Glues: You should have at least one, good, multipurpose glue. A multipurpose glue is one that can adhere to a variety of materials / surfaces. Other specialty glues can be useful too, of course. Also, a basic glue stick is perfect for paper projects because wont wrinkle lightweight paper as badly as a liquid-glue will. Hot glue guns can be really useful, both for gluing and decorative purposes (using colored hot glue). One other alternative to glue is clear nail polish, which you can use for a varnish if you can’t justify buying an entire bottle of mod podge or spray varnish.
  • Sewing Kit: Having a few rolls of thread and some needles can come in handy whenever you want to use a few stitches to help secure something, or repair something. Sewing needles can also be useful as a tool to clear out a glue tip or to texture clay. You can buy sewing needles and thread separately, or you can just buy yourself a travel sewing kit.
  • Toothpicks: There are so many uses for these… like needles you can use them to help clear out the tip of a glue, but there are tons of other things you can do with them. I like to keep a box on hand because you never know when having that disposable, tiny tip can be really helpful.
  • Container / Box: Of course you’ll want to have something to store your supplies in. Depending on how much you have, you might need a big box or a little one. Or you might want to separate some of the items in to two groups for storage. You can get as fancy or as basic as you want: go the cheap way by using a large shoebox, or go ahead and get yourself a fancy-shmancy plastic art supply tote. Make-up train cases and Tupperware work well too.
  • Additional / Other Items: Razor blades, acrylic paints (the mini type), a compass, different types of tape, permanent markers and pens, colored pencils, cotton balls, Q-tips, or anything else you find useful on a regular basis.

(Keep in mind that if you’re putting together a crafting kit for a child, there are obviously some things that you might want to leave out.. such as Xacto blades and superglue.)

As you collect crafting supplies, you’ll find products that you like and don’t like, products that you use more than others, etc., so you’ll want to go through your crafting kit from time to time to update it. You’re also likely to develop more than one crafting supply box. For instance, I have a small one for clay & clay tools, one for jewelry tools, one for sketching, etc…

Thanks for reading and I hope this article may have given you some ideas for your own crafting life. 🙂